By Bryan “Bud” Jorgenson
Owner and Sales Manager of Bud’s Machine Tools
There are several critical steps you should take when setting up a press brake if you want to get a perfect bend. I like to think of these steps as links in a chain that you forge one piece at a time making sure they are secure before moving on to the next one. If everything is in place, the chain will be strong and function correctly.

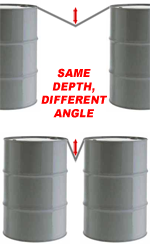
These are not as critical on bigger V-die openings. To illustrate, imagine placing two barrels a foot apart then laying a sheet of light gauge steel across them. If you pushed down in the center an inch or so, you wouldn’t notice much of a degree change in the material. If you then moved the barrels only an inch apart and pushed down the same distance in the center, you would see a much greater degree change.
For instance, if you are bending 20 gauge material on a V-die with a quarter inch opening and your accuracy is off by a mere two thousandths of an inch, you will wind up with a 9 degree change in your bend! Setting up your press brake properly with the following steps will help you get the accurate bend you are after:
- Calibration. The first thing you should do is check and make sure your brake is calibrated properly. Verify that the brake’s ram (the Y-axis) is referencing correctly, which means that it repeats to the identical Y position (or depth) each time it cycles. Also check to determine if crowning is needed to avoid distorting your material. By making a test bend you can see if the middle of your material is wider or narrower in the middle than at the ends. If your 90° bend is bowed out like a canoe in the middle, then the material is deflecting and crowning compensation is needed.
- Tooling. Ensure that you have the correct upper tooling and bottom dies for the job you are bending. Your tooling needs to be able to handle the tonnage needed based on several factors: your V-die opening, your minimum flange length, your material thickness and the inside radius of the formed part. I personally recommend always using precision ground and hardened tooling from a reliable manufacturer. Wila, for example, maintains such tight tolerances in their production (+/- 0.0008″) that you can buy two identical pieces of tooling ten years apart and they will still slide right together to make a uniform tool.
- Control. If you are using a CNC control, it is absolutely critical to know the exact dimensions of your punch and die (height, radius, V-opening, etc.). You then must be sure to draw your tooling correctly as you input it into the control.
- Seating. Verify that your tooling is seated correctly. I would recommend hydraulic clamping, which not only saves time and money, but will seat the tools perfectly every time. Without hydraulic clamping you need to snug your bottom and top tools in (without tightening them), then apply light tonnage to the tools for proper seating, after which you tighten them.
- Material. The final thing to examine is the material itself. In order to keep the parts consistent, check the following aspects of the blanks with each job: type of material, thickness of each batch, tensile and yield strengths, grain direction of each piece and whether the material is free of burrs.
Following this simple checklist will save you a lot of headaches in the long run.

